
It goes without saying, your main priority is to keep your children safe and healthy. Sterilizing your baby's bottles and accessories is one key way you can protect your little ones from harmful bacteria and germs.
Naturally, we recommend Minbie's Sterilizer, but it's important to remember that however you choose to sterilize your baby's bottles & nipples, it's crucial you pick a way that won't degrade the material or damage it in any way.
BE PREPARED WITH THE VERY BEST STERILIZER TO KEEP YOUR FAMILY SAFE! CLICK HERE TO VIEW OUR STERILIZERS & BUNDLES!


When you invest in Minbie to help you feed and care for your children, you are choosing award winning design, great quality, and peace of mind for your journey.
Why is sterilisation important?
Sterilizing all bottles and nipples is incredibly important in order to keep your baby safe from harmful bacteria, viruses, parasites and other pathogens that can make them sick. When a baby is born they're especially vulnerable. Their newly formed immune systems aren’t yet strong enough to fight off certain infections, so making sure all bottles and feeding equipment are properly sterilized is one way to help ensure baby doesn't become ill. For instance, a 12-month-old still only has 15-17% of an adult level of the IgA immunoglobulin, which is important for fighting the bacteria that causes gastroenteritis.
As your baby gets older, it can seem silly to be sterilizing bottles and nipples when everything else they get their hands on goes straight into their mouth! However, milk is particularly good at growing some of the nastiest pathogens so unsterilized bottles really do have the potential to make your baby much more sick than the pacifier on the sofa.
Cleaning, disinfecting and sterilizing are very different processes. Cleaning removes foreign particles like formula, milk and dirt whilst disinfecting destroys pathogenic (disease-causing) microorganisms and removes most organisms from the surface of an item.
When should I sterilize baby bottles?
Baby bottles should be sterilized every time they’re used, ideally directly before they are filled with formula, expressed breast milk or any other liquid. You can, however, sterilize them a little in advance if required; the exact length of time depends on the sterilization method.
What do I really need to sterilize?
All of your baby’s feeding equipment should be sterilized. This includes bottles and all their components such as collars, nipples, lids, seals and any travel containers you use when you're out and about. If you express breast milk you also need to sterilize the components of your breast pump (follow the manufacturer's directions about which components need to be sterilized and for advice on how to carry out the process). Pacifiers should be sterilized too.
Sterilization Methods:
![]()
Boiling
Boiling is the most basic method of sterilizing using heat. To sterilize your baby bottles and nipples by boiling them, follow these steps:
- Check the manufacturers guidelines to make sure your bottles, nipples and anything else you wish to sterilize are able to be boiled safely.
- Put all the items you need to sterilize into a large pot.
- Fill the pot with water until everything is completely submerged. Make sure there aren’t any air bubbles inside any of the bottles or nipples.
- Bring the water to a rolling boil and boil for 10 minutes.
- Leave the sterilized items in the pot until you’re ready to fill them or store them in a sterilized container in the fridge. When removing your bottles and nipples, make sure the water has cooled enough that you won’t burn yourself.
- Repeat this process if you don’t use your bottles and nipples within 24 hours of boiling.
Pros
- This is the cheapest method of sterilization.
- You do not need any special equipment to use this sterilization method.
Cons
- Some nipples tend to degrade faster with this method of sterilization.
- This method is time consuming.
- You can't leave boiling water unattended whilst getting on with other things.
- There is a risk you may burn yourself or someone else using this method.
- You need lots of time & equipment for this method.
All Minbie products can be sterilized by boiling.
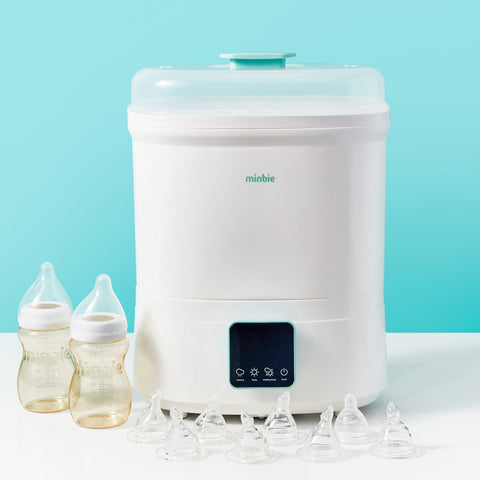
Steam sterilizer

The Minbie Steam Sterilizer & Dryer makes sterilising baby bottles and nipples very easy as it automates most of the process and uses natural steam to kill microorganisms.
To use the Minbie Steam Sterilizer & Dryer, simply put your clean baby bottles and nipples into the unit and add clean water according to the instructions. Then switch the unit on and leave it to do it's work. Our sterilizer will automatically turn off when done & keeps bottles sterile for up to 24 hours saving you time and space.
Pros
- This sterilization method is very simple to use.
- This method is more effective than boiling or microwave sterilizing as there is less room for human error.
- Sterilize many bottles at once saving time.
- This sterilization method doesn’t cause bottles and nipples to degrade as boiling does.
- Steam is 100% natural and this process uses no chemicals.
- Fast, easy sterilization.
- Storage functions make life easier for busy moms.
Cons
- Steam Sterilizers occasionally need descaling.
This sterilization method can be used on Minbie nipples and bottles.
Microwave
Microwave sterilization uses steam (heat) to sterilize baby bottles and nipples. You’ll get the best results if you purchase a sterilization unit that is designed to be used to sterilize baby bottles in a microwave.
To use these sterilizers, follow the manufacturer’s instructions carefully. Be especially careful that you use the correct power setting on your microwave. If you don’t, you may melt your baby bottles and nipples. You should also ensure you position all bottles and nipples with the openings facing downwards in the sterilizer. If you’re not using the sterilized items immediately, you can store them in the sterilizing unit provided you leave it sealed but consult the manufacturer’s instructions to determine how long you can do this for.
Never put your baby feeding equipment directly into the microwave to sterilize it; it won't effectively sterilize the bottles or nipples and will likely damage them. You should also ensure you never microwave metal items inside a microwave sterilizer.
Pros
- Sterilization is accomplished quickly and easily using this method.
- Microwave steamers are usually fairly inexpensive.
Cons
- Not all baby feeding equipment can be microwaved.
- If you have lots of items to sterilise, it's safer to do them in small batches, which is time consuming.
- Failing to add enough water to the unit may cause the sterilizer to melt or even catch fire.
- You need to be careful to avoid being burned when using this method.
- You may not always have access to a microwave, so you'll need a back up plan.
- Failure to take bottles apart before sterilization causes a pressure build up which could be incredibly dangerous.
- Microwave sterilizers can be bulky and messy to use.
This sterilisation method can be used on Minbie nipples and bottles
Cold-sterilisation chemicals
Cold-sterilization chemicals work by disinfecting bottle feeding equipment. There are a range of sterilizing chemicals available. You can get ready-made liquids, dissolvable powders and effervescent tablets. The active agent varies but many products rely on sodium hypochlorite or sodium dichloroisocyanurate for their disinfectant properties.
In order for these chemicals to disinfect and sterilize properly you must follow the instructions carefully.
To sterilize using one of these products, follow these steps:
- Make up the sterilization solution according to the manufacturer’s instructions in a dedicated sterilization container.
- Put the items you wish to sterilize in your chosen container, making sure they’re covered by the sterilization solution and that there aren’t any bubbles trapped anywhere inside your bottles or nipples.
- Leave your bottles and nipples in the solution for at least the recommended time (usually about 30 mins but be sure to check the manufacturer’s instructions). Whatever container you choose to use for this process, make sure you have a plunger or floating cover that you can use to keep your bottles and nipples completely submerged under the liquid for the entire time.
- Leave your sterilized items in the solution until you need to use them, provided you don’t leave them in there for longer than 24 hours. After 24 hours, you need to replace the sterilization solution.

You should wash the container you use to sterilize with warm soapy water before filling it with each batch of fresh sterilization solution. Don’t store cold-sterilization liquid in a metal container as the chemicals will slowly eat away at the metal.
Pros
- Once you’ve made up a sterilization solution, you can add and remove items throughout the day for as long as the solution remains effective (this is usually 24 hours but refer to the manufacturer’s instructions for the specific product you’re using).
- This method of sterilization can be used when you’re out and about and don’t have access to the equipment needed for other sterilization methods.
- This method of sterilization shouldn’t cause your bottles and nipples to degrade more quickly provided you only leave them in the solution for the minimum amount of time required for successful sterilization.
Cons
- Not all baby bottles are compatible with the chemicals in these products.
- Your baby may be sensitive to one or more of the ingredients in these products.
- These products have a use-by date.
- It can be more difficult to use this sterilization method properly (for instance these products only work if the chemicals are used in the right concentration so if you’re not using a pre-mixed solution you need to be able to accurately measure the water you use to prepare them).
- Leaving your baby bottles and nipples in cold-sterilization chemicals for extended periods of time may cause them to degrade more rapidly than other sterilisation methods.
- This method is time consuming and can be messy.
This sterilization method can be used on Minbie nipples and bottles (and associated parts).
Things to remember
Sterilizing baby bottles and nipples is only effective if every component of the bottle as well as everything that comes into contact with the bottle (your hands and any bottle lids or seals that might be used to mix formula) are clean. So, be sure to sterilize any utensils you use to make up formula and always wash your hands thoroughly before you touch sterilized bottles and nipples.
You’ll find it easier to clean baby feeding equipment if you use hot, soapy water immediately after a feed and then rinse to remove soapy residue. For bottles and nipples that are dishwasher safe, make sure you only wash them in the top rack of the dishwasher.
Always dispose of any bottles or nipples that are cracked, chipped, torn or damaged in any way. This will help to prevent injuries and eliminate sneaky places that pathogens can hide.
Important
Never put your Minbie baby bottles or nipples in the oven.
If you have bottles or nipples that contain BPA, it’s best to avoid sterilizing with heat, especially using the boiling method (which exposes them to heat for the longest amount of time), as this may cause the potentially harmful BPA to leach more rapidly. All Minbie products are BPA-free.
Make sure you have the very best steriliser to keep your family safe! Click here to view our Sterilisers & Bundles!

Leave a comment